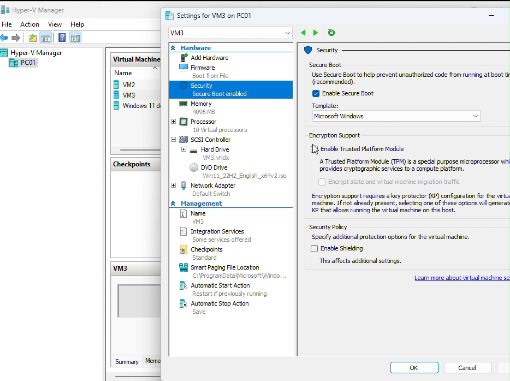
If the Virtual Machine doesn’t support Secure Boot, you can go to VM Settings, Security to enable it.
If you don’t see the Secure Boot in Security, that is because the Secure Boot is supported only on Generation 2 virtual machines.
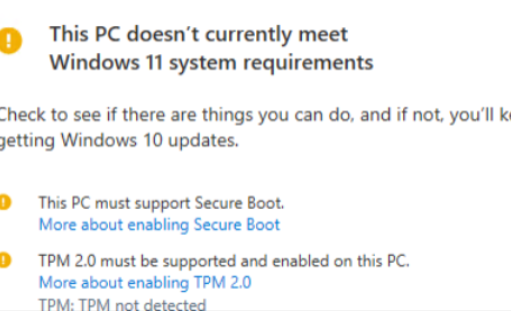
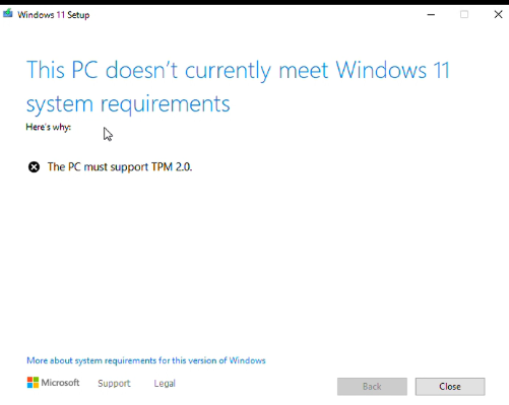
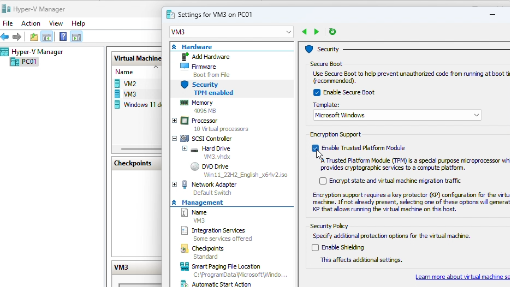
If you receive a message: This PC doesn’t currently meet Windows 11 system requirements, and The PC must support TPM 2.0, you can enable TPM by going to VM Settings, Security,
Windows 10 will reach the end of support on October 14, 2025. After this date, Microsoft will no longer release free security updates, bug fixes, or provide technical support for the operating system. In this video, we will guide you through the process of upgrading from Windows 10 to Windows 11.
Check System Requirements: Ensure your PC meets the minimum requirements for Windows 11. You can use Microsoft’s PC Health Check tool to verify compatibility.
Backup Your Files: Create a backup of all your important files to avoid any data loss during the upgrade process. Type Windows backup in the search bar. Open Windows backup. Use an external hard drive or cloud storage.
Run Windows Updates
1) Open Windows Update: Go to Settings > Update & Security > Windows Update.
Check for Updates: Click on “Check for updates.” If your PC is compatible, the option to upgrade to Windows 11 should appear.
3) Download and Install: Select the Windows 11 update and click “Download and install.” Follow the on-screen instructions.
Restart Your PC: Once the installation is complete, restart your PC when prompted. Your system may reboot several times during the process.
Set Up Windows 11: After the final restart, you’ll be guided through the initial setup for Windows 11.
If your PC is running an older version of Windows 10, you may not be able to upgrade it to Windows 11. In this case, you need to update to the latest version of Windows 10 first.
Another possible reason you can’t upgrade to Windows 11 is that your PC’s current settings do not enable TPM 2.0. If your PC is equipped with TPM 2.0, you may need to access the BIOS and enable it.
We also provide a list of other possible reasons why your PC may not upgrade to Windows 11.
1. Hardware Incompatibility: Windows 11 has specific hardware requirements, such as:
o A compatible processor (Intel 8th Gen/AMD Zen 2 or newer).
o Secure Boot capability.
o At least 4GB of RAM and 64GB of storage.
2. Outdated BIOS/UEFI: If your motherboard’s firmware is outdated, it might not support features like Secure Boot or TPM 2.0 or older CPUs.
3. Unsupported Graphics Card: Windows 11 requires a graphics card compatible with DirectX 12 or later.
4. Registry or Group Policy Blocking Upgrade: Some organizations or users manually block Windows 11 upgrades via **Group Policy** or **Registry edits**.
If the Windows Update check doesn’t offer the option to upgrade to Windows 11, you can manually upgrade by downloading the Windows 11 ISO file and installing it.
You may wonder how to switch Microsoft accounts if you have two—one for business and another for personal use. This video demonstrates how to manage multiple Microsoft accounts in Microsoft Edge and switch between different profiles. Each profile is linked to a separate account, allowing you to keep your browsing data and settings distinct.
Here’s how:
Launch Microsoft Edge and login one of your Microsoft accounts.
Click 3 dots and then Settings.
Click “+ Add profile” and then “Add”.
Sign in to the Microsoft account you want to associate with the new profile. Choose whether to sync data (like bookmarks, extensions, etc.) across devices for this profile.
If you have an issue with Microsoft products, you may contact Microsoft Live Chat Support directly for help by following the steps below. You can use any personal Microsoft account that you may have signed in to, or you can create a new account to contact support and report your problem account.
If you’re experiencing issues with OneDrive and a standard re-installation hasn’t resolved the problem, you may need to completely uninstall OneDrive and remove any residual files or settings. Here’s how to do it:
Step 1: Uninstall OneDrive via Settings
Press Windows + I to open Settings.
Go to Apps > Installed Apps (or Apps & Features).
Scroll down and find Microsoft OneDrive.
Click the three dots (…) next to OneDrive and select Uninstall.
Follow the prompts to complete the uninstallation.
Step 2: Unlink OneDrive from this PC
· If the OneDrive icon still appears in the system tray, open it.
· Click on Settings.
· Navigate to the Account tab and select Unlink this PC.
· If OneDrive still appears after completing these steps, restart your computer and check again.
Step 3: Delete Residual OneDrive Files and Folders
Press Windows + R, type %localappdata%, and press Enter.
Locate and delete the Microsoft folder (or just the OneDrive folder inside it).
Go back to the %localappdata% folder, then navigate to the Temp folder and delete any OneDrive-related files.
Press Windows + R, type %appdata%, and press Enter.
Delete the Microsoft folder (or just the OneDrive folder inside it).
Step 4: Remove OneDrive from the Registry (Advanced)
Warning: Editing the registry can cause system issues if done incorrectly. Proceed with caution and back up your registry before making changes.
Press Windows + R, type regedit, and press Enter.
Navigate to the following keys and delete any OneDrive-related entries:
HKEY_CURRENT_USER\Software\Microsoft\Windows\CurrentVersion\Run (look for a OneDrive entry).
HKEY_LOCAL_MACHINE\SOFTWARE\Microsoft\Windows\CurrentVersion\Run (look for a OneDrive entry).
HKEY_CLASSES_ROOT\CLSID (search for “OneDrive” and delete related keys).
Close the Registry Editor.
Step 5: Restart Your Computer
After completing the steps above, restart your computer to ensure all changes take effect.
Step 6: Reinstall OneDrive (Optional)
If you want to reinstall OneDrive after a clean removal:
Log in to your Yahoo Small Business email account.
Click on the Settings icon (gear icon) and select More Settings.
Go to Mailboxes and select your primary mailbox.
Under the Auto-forwarding section, enter the email address you want to forward your emails to.
Click Verify. Yahoo will send a verification email to the address you entered.
Open the verification email in the recipient’s inbox and follow the instructions to confirm.
Once verified, your emails will be automatically forwarded to the specified address. Keep in mind that this feature might not be available in all regions or accounts.
Microsoft Edge Secure Network is a built-in VPN (Virtual Private Network) feature that enhances your online privacy and security. It encrypts your internet connection, hides your IP address, and protects your browsing activity from hackers and trackers. This feature is powered by Cloudflare and offers 5GB of free data per month when you’re signed in with a personal Microsoft account.
Why Use Microsoft Edge VPN?
Here are some examples of why you might need it:
Secure Public Wi-Fi: When connected to open Wi-Fi networks, such as in cafes or airports, the VPN encrypts your data, protecting it from potential hackers.
Privacy Protection: It prevents websites and advertisers from tracking your online activity by masking your IP address.
Safe Online Transactions: The encryption ensures that sensitive information, like credit card details, remains secure while shopping or banking online.
Access Restricted Content: While it doesn’t allow region selection, it can help bypass some local restrictions by obscuring your location.
How to Enable Microsoft Edge VPN
To Enable Microsoft Edge VPN, please follow these steps:
Sign In:
Open Microsoft Edge and sign in with your personal Microsoft account (not available for enterprise accounts).
Access Settings:
Click the three-dot menu in the top-right corner of the browser.
Select “Settings.”
Enable Secure Network:
Navigate to “Privacy, search, and services.”
Scroll down to the “Security” section and toggle on “Microsoft Edge Secure Network.”
Start Browsing Securely:
Once enabled, the VPN will activate automatically when needed, such as on unsecured networks.
What is Microsoft Edge VPN?
Microsoft Edge Secure Network is a built-in VPN (Virtual Private Network) feature that enhances your online privacy and security. It encrypts your internet connection, hides your IP address, and protects your browsing activity from hackers and trackers. This feature is powered by Cloudflare and offers 5GB of free data per month when you’re signed in with a personal Microsoft account.
Why Use Microsoft Edge VPN?
Here are some examples of why you might need it:
Secure Public Wi-Fi: When connected to open Wi-Fi networks, such as in cafes or airports, the VPN encrypts your data, protecting it from potential hackers.
Privacy Protection: It prevents websites and advertisers from tracking your online activity by masking your IP address.
Safe Online Transactions: The encryption ensures that sensitive information, like credit card details, remains secure while shopping or banking online.
Access Restricted Content: While it doesn’t allow region selection, it can help bypass some local restrictions by obscuring your location.
How to Enable Microsoft Edge VPN
To Enable Microsoft Edge VPN, please follow these steps:
Sign In:
Open Microsoft Edge and sign in with your personal Microsoft account (not available for enterprise accounts).
Access Settings:
Click the three-dot menu in the top-right corner of the browser.
Select “Settings.”
Enable Secure Network:
Navigate to “Privacy, search, and services.”
Scroll down to the “Security” section and toggle on “Microsoft Edge Secure Network.”
Start Browsing Securely:
Once enabled, the VPN will activate automatically when needed, such as on unsecured networks.
you may go through these links and Please optimize the site.
Or check below:
A 504 Gateway Time-out error means that a server, acting as a gateway or proxy, did not receive a timely response from another server that it needed to complete the request. In other words, the server that is supposed to process the request is taking too long, and the proxy or gateway server “times out.”
Common Causes of a 504 Gateway Time-out:
Server Overload: The server handling the request may be overwhelmed by too much traffic or processing demands.
Slow Application: The application running on the server might be taking too long to respond, possibly due to inefficient code, database issues, or heavy load.
Network Issues: There could be a problem with the network between the gateway and the upstream server, causing delays.
DNS Problems: Domain Name System (DNS) issues can cause a delay in resolving the server’s address.
Firewall Restrictions: A firewall might block or limit access to a server, preventing timely communication.
Server Maintenance: If the server you’re trying to connect to is undergoing maintenance, it might not respond in time.
How to Troubleshoot:
Refresh the Page: Sometimes the issue is temporary, and reloading the page after a few seconds might work.
Check Your Internet Connection: Ensure your own connection isn’t causing a delay in reaching the server.
Check Server Logs: If you have access to your web server, look at the logs to find any issues with resource usage or server performance.
Restart the Server: Restarting your web server might help resolve performance or connectivity issues.
Contact Hosting Provider: If the issue persists, contact your hosting provider, as they might need to address the problem on their end.
Check DNS Settings: Ensure your domain’s DNS records are configured properly and aren’t causing any resolution delays.
Disable all Plugins for a test. Some plugins could cause this issue.
his may be caused by corruption in Windows Update. We can attempt to repair Windows update and install the KB manually if required.
To repair Windows Update:
1. Choose Start and type “cmd”. Open Command Prompt as admin. 2. Enter these lines one at a time:
net stop bits net stop wuauserv net stop appidsvc net stop cryptsvc ren %systemroot%\SoftwareDistribution SoftwareDistribution.old ren %systemroot%\system32\catroot2 catroot2.old net start bits net start wuauserv net start appidsvc net start cryptsvc
3. Close the command prompt window and restart.
If that does not resolve your issue then you can install the KB manually.
1. Choose Start and type “winver”. Open winver. 2. Note down your Windows version information. 3. Go to https://www.catalog.update.microsoft.com/Home.aspx and search for the KB. 4. On the next page, locate the version for your machine. You most likely have an x64 installation. Use the winver information if needed to pin down which one you want. 5. Download the KB. 6. Run the installer. 7. Reboot.