Tesla vehicles use multiple cameras to monitor surroundings and enhance features like Autopilot, Sentry Mode, and parking assistance.
Tesla Model Y is equipped with multiple cameras that actively monitor the environment. Let’s take a look at their locations and what they do:
Front Camera System Three cameras are located behind the windshield, near the rearview mirror. These help with Autopilot, lane keeping, and detecting traffic.
Side Cameras Cameras on the side repeaters and B-pillars assist with blind-spot monitoring, lane changes, and parking maneuvers.
Rear Camera A camera above the rear license plate provides a clear view for reversing and works with Sentry Mode to capture footage.
Door Pillar Cameras
Each door pillar has a camera that helps detect surrounding vehicles, enhancing Autopilot and safety features.
These cameras play a vital role in Tesla’s driver-assist features, including:
Autopilot & Full Self-Driving (FSD) – Uses front and side cameras to navigate roads.
Sentry Mode – Records surroundings when the vehicle is parked.
Blind Spot Monitoring – Provides visual alerts when changing lanes.
To ensure optimal performance, keep your cameras clean and unobstructed. Use a microfiber cloth to wipe them down regularly, especially after rain or snow.
Today, we’re diving into a common issue some Tesla owners face: camera problems. From blurry images to Autopilot issues or error messages, let’s discuss the symptoms and how to fix them.
Symptoms of Tesla Camera Issues.
Camera Unavailable Warning – You might see a message saying ‘Camera Unavailable’ or ‘Camera Visibility Reduced.’
Blurry or Blacked-Out Feeds – Some cameras may show blurry images or go completely black.
Autopilot and Cruise Control Malfunctions – If the cameras fail, features like Autopilot, lane assist, cruise control and Smart Summon may stop working.
Navigation Issues – Problems with the cameras can affect the navigation system, causing it to freeze or display incorrect information.
Sentry Mode Recording Issues – Your Tesla might fail to record events properly.”
Now, let’s talk about some solutions!
Solution 1: Clean the Cameras. Regularly clean the cameras to ensure they are free from dirt, water, or other obstructions. Please refer to another video for Tesla camera locations by clicking the card in the top right-hand corner of the screen.
Solution 2: Ensure Software is Up to Date. Check for any available software updates and install them to fix potential bugs.
Solution 3: Reboot the system. Sometimes, a simple reboot can fix the issue. Press and hold both scroll wheels on the steering wheel until the screen goes black. This forces a restart of the infotainment system. Wait a minute or two, and see if the cameras come back online.
Solution 4: Power Cycle the Car [Host demonstrates the steps on the screen] “If a simple restart doesn’t work, perform a power cycle:
Go to ‘Controls’ > ‘Safety’ > ‘Power Off.’
Wait for 2-3 minutes without touching anything.
Press the brake pedal to turn the car back on.”
Solution 5: Inspect Camera Connections If your cameras are still not working, there might be a loose or faulty connection. You can schedule a service appointment through the Tesla app.
Note: Tesla recalled over 239,000 vehicles in January 2025 due to a rearview camera issue. The issue was caused by a short in the computer circuit board that could result in the loss of the rearview camera image.
Affected vehicles 2024–2025 Model 3, 2023–2025 Model Y, 2024–2025 Model S, and 2023–2025 Model X.
Impact
The loss of the rearview camera image can reduce the driver’s rear visibility and increase the risk of a collision
Remedy
Tesla owners can check if their vehicle is affected by using the Tesla VIN Recall Search or the NHTSA VIN Recall Search tool
Drivers can use their mirrors and perform a shoulder check to reverse the vehicle
Drivers can schedule a service appointment using the mobile app
Call the NHTSA vehicle safety hotline at 1-888-327-4236 (TTY 1-800-424-9153)
And that’s it! Most camera issues can be resolved with these simple steps. But if the problem persists, don’t hesitate to reach out to Tesla Support—they’re there to help.
Sign in to the Admin Center: Go to the Microsoft 365 Admin Center and sign in with your admin credentials.
Go to Users: Select Users from the left-hand navigation panel, then choose Active users.
Select the User: Find the user whose authentication methods you want to update and click on their name.
Navigate to Authentication Methods: Click on the Authentication methods tab.
Add or Change Methods: Here, you can add, change, or remove the user’s authentication methods (e.g., phone number, email). To add a method, click Add method, select the type, and enter the required information.
Save Changes: Once you’ve made the necessary changes, make sure to save your changes.
Log into your Office 365 Account: Go to office.com and sign in with your credentials.
Access Your Account Settings: Click on your avatar in the top right corner and select View account[1^].
Navigate to Security Info: Under the Security info section, choose Update info. This will take you to the page where you can manage your authentication methods.
Edit Your Authentication Method: From here, you can add, remove, or change your phone number, email, or app used for authentication. You’ll see options to set up multi-factor authentication (MFA) if it’s not already configured1.
Save Your Changes: Once you’ve updated the desired information, make sure to click Save to apply the changes.
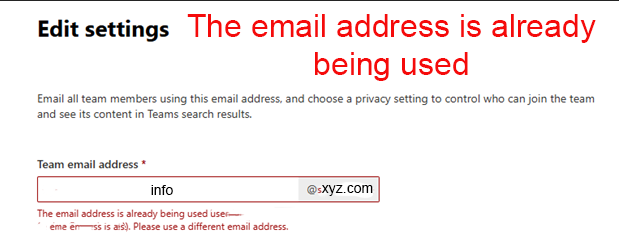
We have two domain names in Microsoft 365 within one tenant, abc.comand xyz.com.We already have a Teams group named “info” with the email address info@abc.com for members A, B, and C. When we try to create a Teams group with the same name “info” on xyz.comfor members X, Y, and Z, we get the error “The email address is already being used.”
Online search result states: Although the abc.com domain name is different from xyz.com, they are all in the same tenant. You can’t have the same group name across all your domain names in the same tenant.
Simplest way around this is to initially create a group mailbox with a different alias e.g. infomation@abc.com. Then once created, go in and add the correct address as an alias, info@xyz.com and make it primary. Then you can remove the information@abc.com alias.
Ensure you have the correct account number, billing address, and any required PIN from your current service provider.
Check for pending issues:
Resolve any overdue invoices or outstanding contracts with your current provider, as they may block or delay the porting process.
Choose the numbers to port:
Make a list of the phone numbers you want to transfer.
Step 2: Submit a Porting Request in Microsoft Teams
Log in to Microsoft Teams Admin Center:
Use your admin credentials to access the portal.
Go to Voice > Phone Numbers > Port Orders.
Create a New Port Order:
Log in to Microsoft Teams Admin Center:
Use your admin credentials to access the portal.
Go to Voice > Phone Numbers > Port Orders.
Create a New Port Order:
Assuming you would like to transfer a 855 toll-Free number to your current phone number 847, click on Port.
Enter your current provider’s details and the list of phone numbers to port.
Select the country or region and enter the phone number.
Click on Next and make sure valid number is marked green.
Add account information such as Order name, Requested port date, Organization, Service provider, Authorized user details,
Upload a Letter of Authorization (LOA):
Microsoft Upload a Letter of Authorization (LOA):
Microsoft may require you to provide an LOA, which authorizes them to act on your behalf to transfer the numbers.
Step 3: Review and Submit
Double-check all details:
Verify the accuracy of your account information and the list of numbers.
Submit the port order:
Once submitted, Microsoft will validate the information and forward it to your current provider for approval. You can check the order status from Microsoft Teams admin center, Voice, Phone numbers, Oder History.
Step 4: Monitor the Porting Status
Track the progress in the Admin Center:
Go to Voice > Port Orders to view the status of your request.
Respond to any rejections or issues:
If the porting request is rejected, Microsoft will notify you with the reason. Common causes include:
Incorrect Customer name.
Incorrect service address.
Mismatched authorized person
Mismatched phone numbers.
Work with your current provider to resolve issues:
Correct any mismatches or pending items as needed.
Step 5: Complete the Transfer
Receive a confirmation from Microsoft:
You’ll be notified once the porting is complete, usually within 3–7 business days.
Test the numbers in Microsoft Teams:
Make test calls to ensure the numbers are active and functioning in Teams.
Update call routing settings:
Set up auto-attendants, call queues, or direct routing if necessary.
Tips for a Smooth Porting Process
Always have backup numbers or services during the porting period to avoid interruptions.
Microsoft claims that printing errors 0x00000709, 0x0000007c & 0x000006e4 are resolved with KB5007253 update. So, before proceeding to the methods below, download and install manually the KB5007253 from Microsoft Update Catalog and see if the problem is fixed.
Method 2. Fix Network Printing Error 0x00000709 in Registry.
1. Open Command prompt as Administrator. 2. In Command Prompt give the following command according your Windows 10 version:
Method 3. Fix error 0x00000709 in Network Printing by Overriding Printer Installation Restrictions.
Windows updates released August 10, 2021 and later will, by default, require administrative privilege to install drivers. To work around this behavior and allow users to install network printer drivers, do the following:
1. Open Command prompt as Administrator. 2. In command prompt, give the following command:
Method 4: Edit The Group Policy And System’s Registry
Since Windows 11 22H2 the default connection method has changed, and you will need to alter a Group Policy Editor setting to resolve the issue.
If you have a printer server or host, you will need to make changes to that system as well. If you have a network-shared printer, then only apply the client-side configurations.
On the Host
Click Windows and type GPEdit.
Open Group Policy Editor
2. Select Edit Group Policy and to Computer Configuration > Administrative Templates > Printers.
3. Open Configure RPC Connection Settings and set it to Enabled.
4. Set the dropdown of Protocol to Use for Outgoing RPC Connections to RPC Over Named Pipes.
Enable Configure RPC Connection Settings and Set its Protocol to RPC Over Named Pipes
5. Open Configure RPC Listener Settings and set it to Enabled.
Open Configure RPC Listner Settings
6. Set the protocol to Choose RPC Over Named Pipes and TCP.
7. Click Windows and search for Registry Editor.
8. Right-click on it and select Run as Administrator.
The first method for solving printing or network printer installation problems is to remove KB5006670 & KB5007186 (if installed). To do that:
1. Open the Runutility by pressing the Windows + R keys on your keyboard. 2. Type cmd and press the keys Ctrl+Shift+Enter to open the Command Prompt in Admin mode. *
* Note: If you see any windows asking up for permission, click on Yes.
3. Type the following command and press Enter:
wusa /uninstall /kb:5006670
4. Once a Confirmation dialogue box appears, click on Yes.
5. Once the uninstallation process is completed, restart the computer. 6. Now try to print or to install your default printer. The printer installation should succeed this time. If you still face problems, proceed and uninstall also the KB5007186 update, by giving this command (in admin command prompt): *
wusa /uninstall /kb:5007186
* Note: If your be able to install the default printer without error, I suggest to prevent KB5006670 update to be reinstalled on the future, by doing the following:
1. Download the Show or Hide updates tool tool from: https://www.majorgeeks.com/files/details/wushowhide.html 2. Run the “wushowhide.diagcab”, click Next and then click Hide Updates. 3. Select the 2021-10 Cumulative Update for Windows 10 (KB5006670) and click Next.
Method 6: Bypass 0x00000709 error by Setting the Default Printer in Registry.
Another method to overcome the printer error “0x00000709 – Operation cannot be completed”, is to set default printer in registry. (This method works in Windows 7 OS) *
* Note: This method has been tested and works on the Windows 7 operating system when the default printer cannot be set by using the usual way (Control Panel > Devices & Printers > right-click on Printer > Set as Default).
Step 1. Copy the Printer Name as it appears on Printers group.
1. Navigate to Control Panel -> Devices & Printers. 2.Right-click the printer you can’t print to and select Properties. 3.Mark the printer’s name and right-click -> Copy.
Step 2. Set Default Printer in Registry.
1. Open the Run utility using the Windows + R shortcut on your keyboard. 2. Type regedit and press OK. *
* Note: If you see any windows asking up for permission, click on Yes.
3. In Registry Editor window, navigate to this location: *
4. Now take a moment to create a backup of the “Windows” registry key as follows: *
* Important: Modifying Registry is highly risky, so make sure to take a backup before modifying. Creating a backup will help you to revert at any time.
a. Right-click on Windows key and select Export.
b. Choose the location where you wish to save the registry key backup and rename it accordingly. Click on Save.
5a. Now select the Windows folder on the left and then double-click on Device REG_SZ value on the right pane.
5b. On the Value data, type (paste) the name of your Printer as it’s shown at Devices & Printers* and click OK. **
* Important Notes: 1. Make sure you do not make any changes after the first dot (.) and leave the “.winspool.Ne0x:” value untouched. Just change the name of the printer as shown in the screenshot below. 2. If the printer is shared by another computer, type the printer name as follows: ¨\\ComputerName\PrinterName”
** 3. If you receive the error “Cannot edit Device: Error writing the value’s new contents”, proceed as follows:
1. Right-Click on Windows key and select Permissions
2. On Restricted, Administrators and your account, select Full Control & Read and click OK.
3. Perform steps 5a & 5b to modify the Device REG_SZ value as instructed above .
6. Close Registry Editor and restart your PC.
Method 7. Uninstall and re-Install Printer.
The last method to fix the network printing error 0x00000709, is to re-install the shared printer. To do that:
1. Navigate to Control Panel -> Devices & Printers. 2. Right-click on the Printer and select Remove Device.
3. Finally, re-install the network printer by using one of the following ways:
Way 1. Click Add a Printer and let Windows to find and install the network printer.
Way 2. Install the Shared Printer from Network:
1. Open the “Run” command box. 2. Type “\\” followed by the name of the machine on your network with the shared printer and click OK.
3. Right-click on the shared printer and click Connect.