Fixing Error Code 80090034 when Activating Office

Situation: When attempting to activate office 365, you may receive this message: Error Code 80090034.

Case 1: The client’s domain name is compnayname.mydomain,com and email address is username@mydomain.com. When he setup a new laptop, the laptop takes username@compnayname.mydomain.com as email address. To fix this problem, go to Settings>Account>Access work or school to delete username@compnayname.mydomain.com. Re-assign in using username@mydomain.com.

Case 2: Try this method:

Go to the registry editor (Win+R; regedit)

go to HKEY_CURRENT_USER -> Software -> Microsoft ->Office -> 16.0 ->Common -> Identity

Inside “Identity”, create a new REG_DWORD value called “EnableADAL” and leave the value at 0

Restart the PC and try again to login from Office 365. In my case, the logon screen was now different and it worked perfectly.

case 3: Repair the Office 365 under control Panel>Uninstall programs.

Case 4: Re-install Office 365.

Case 5: Solution was to set this registry key:

HKEY_LOCAL_MACHINE\Software\Microsoft\Cryptography\Protect\Providers\df9d8cd0-1501-11d1-8c7a-00c04fc297eb\ProtectionPolicy = 1 (DWORD)

Problem to join the Windows domain

Case 1. The client’s domain name is companyname.mydoamin.com, he doesn’t know which is the domain name. If their have correct name resolution or DNS setup, either pre-windows 2000 name compnayname or GQDN companyname.mydoamin.com should work.

Case 2. In above case 1, only pre-windows 2000 name compnayname works, GQDN companyname.mydoamin.com doesn’t. The reason for this, it could be the mydoamin.com is the public domain name. If you ping mydoamin.com and get a public IP address. You may not be able to join the domain use the public domain name, like mydoamin.com. In this case, you may create A record in your DNS and point the mydoamin.com your local private IP address. Otherwise you must use pre-windows 2000 name like compnayname in out above example.

Case 3. in above case 1 and 2, pre-windows name doesn’t work also. one resolution is install WINS server on your DC.

Case 4: in above case 1 and 2, none of pre-windows name or FQDN works. In this case check the DNS settings. In one of our cases, the client use their router as DNS server. it is recommended to setup DNS on the DC and each client use the DC DNS as primary DNS server.

Case 5. in other case, the client setup a laptop using WiFi. However, the WiFi uses different IP range from wired. Using Wired connection fixes the problem.

Case 6. Use network ID instead of Change to join the domain.

7. Using hosts or/and lmhosts.

Fixing Windows 10 Desktop Icons missing

Situation: The use login this morning, all icons in the Desktop are missing and it is blue screen.

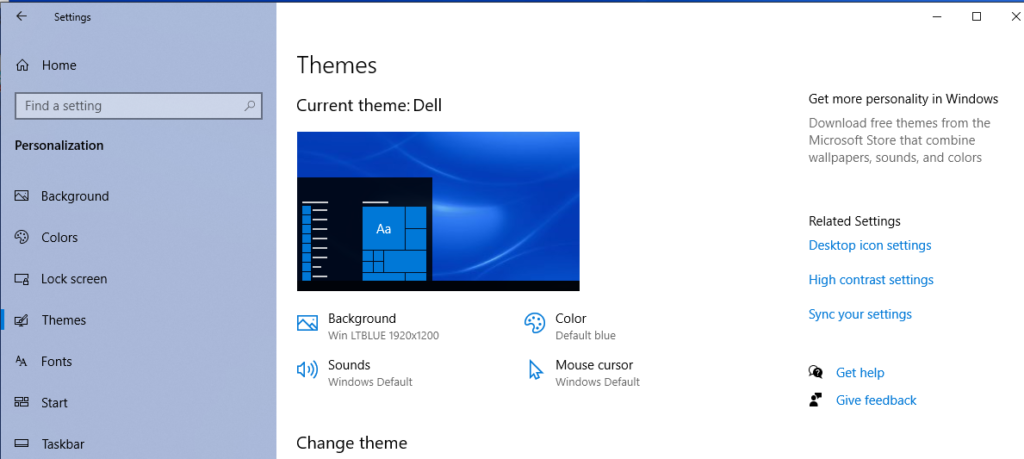
Troubleshooting: 1. Enable “Show desktop icons” by right-0clciking on the blue screen and go to View.

2. Enable the Desktop Icons Visibility

  • Right-click on blue screen and select “Personalization”.
  • Select the “Themes” tab from the left pane.
  • Click on “Desktop icon settings” to open the settings.
  • Select the icons you want to show on the desktop or click on “Restore Default”, and then click on “OK” to save the settings.
3. Disable the Tablet Mode
  • Open the Settings> System to open the system settings.
  • On the left pane, click on “Tablet” and make sure you don’t use Tablet Mode.

Mitel: Either your username, password, or server didn’t match

Situation: When a new user login Mitel Connect, she receives this message: Either your username, password, or server didn’t match.

Troubleshooting: 1. Since the Domain already has the domain name entered, don’t use domain in username. The correct username is username. If you enter domainname\username, that may not work.

2. Sometimes, email as suername doesn’t work.

3. Also make sure you sync the AD under General.

Windows server lost connection after restart

Situation; The client has a Windows 2012 R2 as Mitel phone server. After they start the server, they can’t ping or RDP into it.

Troubleshooting: 1. Ping server, it back with 169.x.x.x IP address.

2. The NIC 1 IP address should be 10.0..40. However, it was assigned 169.x.x.255 IP address which is  auto-configured addresses.

3. We try to use DHCP to assign the IP address, but it doesn’t work. It still shows 169 IP address.

4. Then we reset IP address to 10.0.0.40, but it doesn’t take it and still show 169 address.

5. We fixed the problem by connecting the cable to NIC 2 and assign IP 10.0.0.40. I also remove the 10.0.0.40 from NIC.

Troubleshooting Internet issue

If you have problem to access the internet, try one of the follow suggestions.

  1. Try to ping a public IP address, for example, ping 8.8.8.8. If you can’t ping any public IP address, go to step 2. If you can ping IP address, then ping a website, for example ping chicagotech.net. If you can’t ping the website, it could be the DNS issue. Go to step 3. If you can ping the website but can’t access it, go to step 4.
  2. Check the ip configuration by running ipconfig /all command.
  3. Check the DNS settings. Perhaps you want to add 8.8.8.8 IP address as DNS.
  4. If you can ping the website but can’t access it, clean the caches, history, and cooks. Or try different browser.
  5. If your computer can’t access the internet, try different computer. If other computer work fine, go to step 3 to check the DNS and step 4 to clean the cache.
  6. If you can’t access one or some websites, check the firewall or security software. Also your company firewall may block domain computers accessing some website.
  7. In many cases, reset modem may fix the Internet access problem.
  8. Mutil-home (two or more NICs) computer may have a problem to access the Internet.
  9. After a windows update, you can’t access the Internet. It could be NIC issue. install latest NIC driver.

Please view this step by step video:

Some apps don’t work after Windows update

Situation: The client just installed windows 10 update. Now, she can’t run some apps.

Troubleshooting: 1. check the Windows update status. if there are other update pending, please complete the update.

2. Restart Windows one or more times.

3. Repair or re-install/upgrade the apps. Go to Control Panel>Programs and features. highlight the program and click change to repair or uninstall. Then re-install it.

4. Reset Store Cache: run “Command Prompt”, choose “Run as administrator“. run this command: “wsreset.exe”.

5. Change Ownership Of Your Drive: Right-click on the drive C in most cases) and select “Properties”. Go to “Security” tab and then click on “Advanced”. In Advanced Security Settings click o  “Owner” and click on “Change”. change to Administrators.

6. Change FilterAdministratorToken: Run registry and this path: “HKEY_LOCAL_MACHINES\SOFTWARE\Microsoft\Windows\CurrentVersion\Policies\System”. Find “FilterAdministratorToken” and double click on it. If “FilterAdministratorToken” does not exist, you can create it by right-clicking on the right pane and choosing “New”, then “DWORD (32-bit)” value. Change the name of the new value to FilterAdministratorToken.

7. Run DIS

* Type cmd in the Windows search bar, right-click on the Command Prompt and run it as an administrator.

  • In the command line, copy paste these lines one by one and press Enter after each:
  • DISM /online /Cleanup-Image / ScanHealth
  • DISM /Online /Cleanup-Image /RestoreHealth
  • Wait until the procedure ends (it might take up to 10 minutes).
  • Restart your PC.

8. System file check (SFC). Please refer to this post:

Many Windows and update problems can be fixed by running …

Troubleshooting emails, folders or contacts missing after Windows update

Situation: The client uses Office 365. The Outlook lost some emails, folders and contacts after a windows update.

Troubleshooting: Assuming al email and items are saved in the server or office 365, you may try one of these fixes.

1: Reset Use Cached Exchange Mode to download email to an Outlook data file. In Outlook, click File>Account Settings>Account Settings. highlight the email address nd click on Change. Uncheck the Use Cached Exchange Mode to download email to an Outlook data file. restart the Outlook. It may take a while to restore missing items.

2. Repair Outlook. You can do it in Outlook Account Settings page. Highlight the email account, and click Repair.

3. Alternatively, you can repair Outlook in Control Panel>programs and features. Highlight the office 365 and click on change.

4. Create another Outlook profile to test it or test it in different computer.