Windows 10 client doesn’t receive IP address from DHCP

Situation: One of workstations doesn’t connect to the Internet. Both WiFi and Wired show No Internet.

Troubleshooting:

1. ipconfig command shows 169.254.x.x IP, which is auto IP addresse.

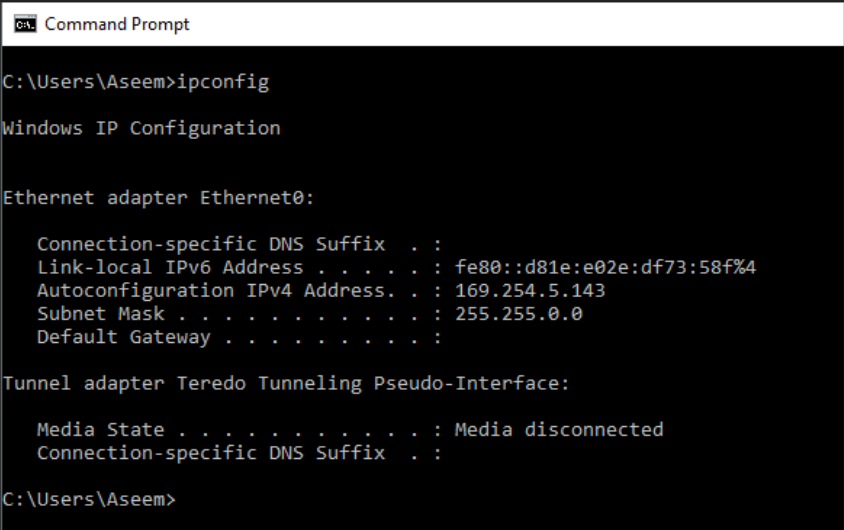
2. Ipconfig /renew gets this message:

No operation can be performed on Local Area Connection while it has its media disconnected.

3. We find an Event error: Event ID 1041 – The DHCP service is not servicing any clients because none of the active network interfaces have statically configured IP addresses or there are no active interfaces.

Based on our database, http://www.chicagotech.net/wineventid2.htm#Event%20ID%201041%20-%20The%20DHCP%20service

This event causes:

1. Bad NIC.

2. Incorrect NIC hardware settings.

3. Incorrect TCP/IP settings.

Resolution: Microsoft recommends to enable IPv6 on all Windows even you don’t use it.

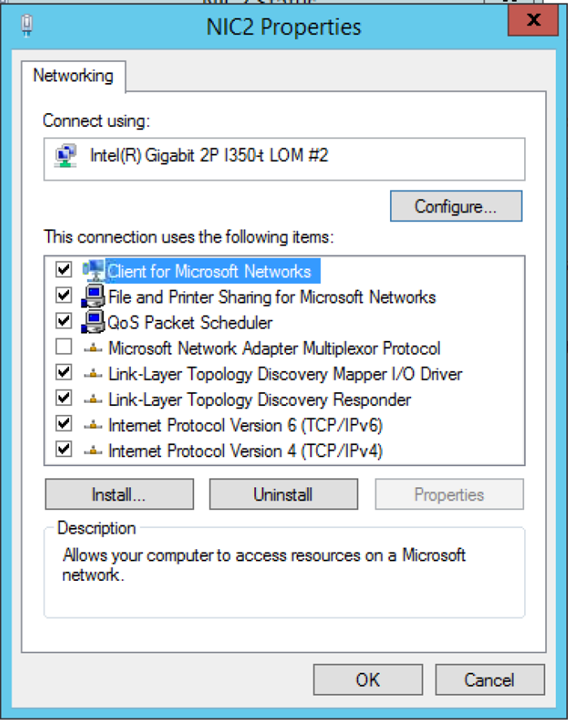
To fix the problem, go to Network and Sharing Center on the DHCP server. Double click on Connects  (NIC2 in our example).

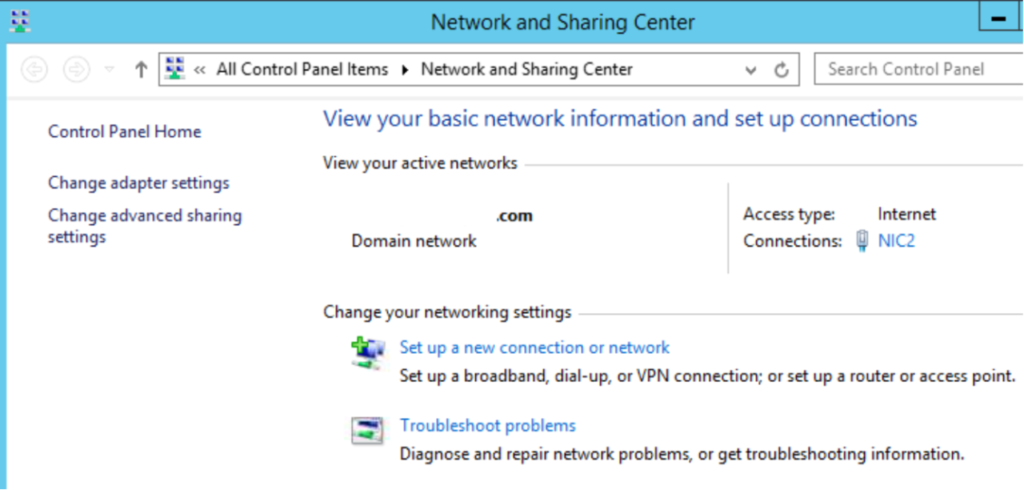
Click on Properties.

Check the and click all OKs to save the settings. Internet Protocol Version 6 (TCP/IP)

Restart the DHCP service.

That should fix the problem. You can confirm it by checking the Event Viewer and run ipconfig /renew on problematical computers.

Note: for troubleshooting, we can set IP address manually on the client to test the internet connection.

Please view this step by step video:

Outlook detected a COM add-in problem

Situation: After a Microsoft update, you may receive this message when running Outlook: Outlook detected a COM add-in problem.

Troubleshooting: 1. Click on Always enable this add-in.

2. Fixing it from Manage COM Add-ins

* Click File in Outlook.

* Click on Manage COM Add-ins Slow and Disable COM Add-ins. 

* Find the Add-in you want to fix, and then Options, For example Microsoft Teams.

* Check Always enable this add-in and then Apply.

* Close and test the add-in again. 

Please view this step by step video:

Fixing Outlook detected a COM add-in problem

No option on Control Panel to repair or uninstall Office 365

Situation: When the client tries to repair or Uninstall Office 365, he can’t see it in Control Panel>Programs & Features as show next page.

Troubleshooting: We did similar problem  after a Microsoft Update. To repair or uninstall Office 365, go to Settings>Apps>Apps & Features. Double click on Microsoft Office Desktop Apps. To uninstall click Uninstall.

In popup, click Uninstall again.

To repair, click on Advanced options

You will have these options: Set default apps, Terminate, Repair, Reset and Uninstall.

In the bottom, you have options to uninstall induvial apps.

Or type office in the Search bar, the click on App settings.

In Office page, move down. You will have Repair, Reset and Uninstall options.

Please view this Video:

No option on Control Panel to repair or uninstall Office 365

Missing Office 365 in Control Panel>Programs & Features list

Situation: When the client tries to repair or Uninstall Office 365, he can’t see it in Control Panel>Programs & Features as show next page.

Troubleshooting: We did similar problem  after a Microsoft Update. To repair or uninstall Office 365, go to Settings>Apps>Apps & Features. Double click on Microsoft Office Desktop Apps. To uninstall click Uninstall.

In popup, click Uninstall again

To repair, click on Advanced options

You will have these options: Set default apps, Terminate, Repair, Reset and Uninstall.

In the bottom, you have options to uninstall induvial apps.

Or type office in the Search bar, the click on App settings.

In Office page, move down. You will have Repair, Reset and Uninstall options.

Please view this Video:

Please view this step by step video:

Fixing Add-ins Error Code: 8007007E

Situation: The user has a problem to run CRM Add-ins on his Outlook with the 8007007e error code.

Troubleshooting: 1. It could be the Windows update problem. Run SFC /Scannow to make sure there is no system corruption. Please refer to this post:

Many Windows and update problems can be fixed by running …

2. Microsoft Office installation is damaged so uninstall and re-install Office 365. Please refer to this post:

No option on Control Panel to repair or uninstall Office 365

3. Re-install ad-ins.

Adobe Reader: Compatibility Problem

Situation: When the user open PDF from their app, she gets this message:

Compatibility Problem

An incompatible piece of software attempted to load along with Microsoft Edge.  This can be caused by malware, though its usually caused by a program that is out-of-date.

Troubleshooting: It may open from Microsoft Edge is is default browser to open PDF file. To change the default app to open PDF, please follow these steps:

Missing Additional Security Verification in Office 365

To change Multi-factor Authentication (MFA) or two-factor verification, you used to login Office 365 and go to settings>Additional Security Verification. However, you don’t see this option anymore. Microsoft has removed the Additional Security Verification from Office 365. This will show you how to change MFA method.

1.Click on this link:

https://account.activedirectory.windowsazure.com/proofup.aspx?proofup=1

Or https://aka.ms/mfasetup

to access Office 365 Additional security verification page.

2. If the Sign in page popup, login using your Office 365 credentials.

  • Select your email address.
  • Enter your password and click Sign in.

3. In Additional security verification page, you will have these options: Authentication phone (normally it is your smart phone) , Office phone (you can have extension here), Alternative authentication phone and Authentication app or Token. Choose how you want to do your verification.

4. Click Save to save the settings.

Note: 1.Although all options are listed, your admin may not make them all available; you’ll get a message if you choose an option your admin didn’t enable. 2.You also have an option to restore multi-factor authentication on previously trust devices. ●

Please view this step b ystep video:

Unable to remove user from delegate access with Couldn’t find the object

 Situation: The client uses Office 365. When he attempting to removed a user from the distribution list, he received Couldn’t find the object message.

Troubleshooting: We find the user has been disabled and also no Office 365 license

Resolution: 1. Enabled the user account.

2. We assigned office teams license to the user. Note: you don’t have to assign E1 or E3 license.

3. Removed user from the delegate access.

4. Delete the user from the domain.

The message was sent to the following group, which doesn’t allow messages from external senders

Situation: The client created distribution group for sending emails to external customers in Office 365. However, the external customers don’t receive the email from the group email.

Troubleshooting: By default, only senders inside your organization can send messages to distribution group.

If you check Trace email and you will find the following error:  “The message was sent to the following group, which doesn’t allow messages from external senders”.

To fix the problem, Login Office portal. Go to Exchange admin center.

In Exchange admin center, click recipients

Then click on groups

Highlight the group, which has a problem to send email to outside. Then click Edit icon. 

Click on delivery management and check Senders inside and outside of my organization.

Click Save to save the settings and test it.

Please view this step by step video:

Fixing Microsoft Print to PDF problem

When attempting to save a document to PDF using Microsoft Print to PDF, you may have a problem. This article show you how to fix it.

1.Restart the computer after Windows updates

* If the Windows 10 has a Windows update installed, and waiting for restart, some Windows features may not work. Restart Windows may fix the problem.

2. Disable and re-enable Microsoft Print to PDF

* Type Windows features in Search bar and click Open.

• Uncheck to disable Microsoft Print to the PDF

•Click OK to save the settings.

•Then go back the Windows Features to enable it and save the settings.

3. Reinstall Microsoft Print to PDF

* Click Settings

* Click on Devices

• Click Printer & Scanners

* Click on Microsoft Print to PDF, and then Remove device.

* Click Yes to confirm it.

* After removing the Microsoft Print to PDF, click Add a printer or scanners.

* Click on The printer that I want isn’t listed.

* Check Add a local printer or network printer with manual settings. Then Next.

* Make sure Use an existing port is checked. Then Next.

* In Install the printer driver, highlight Microsoft under Manufacture, and Microsoft Print To PDF under Printer.

* Keep the default printer name, Microsoft Print to PDF, and click  Next

Click Finish

Please view this step by step vidoe: