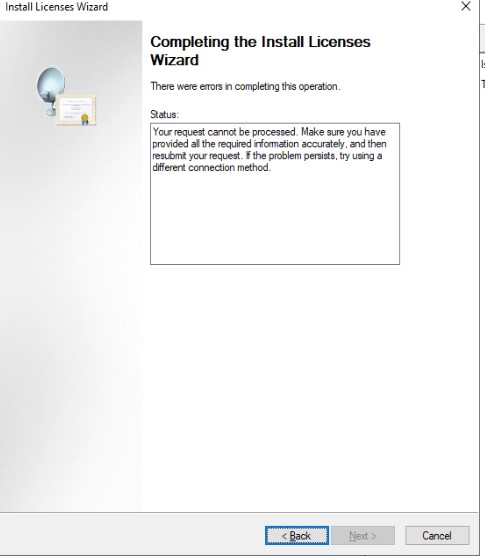
Situation: When attempting to install Microsoft RD CALs on Windows 2019 server, they can’t process it with an error.

Troubleshooting: We find they enter an incorrect agreement # or the agreement # has been installed don other server.
Situation: When attempting to install Microsoft RD CALs on Windows 2019 server, they can’t process it with an error.

Troubleshooting: We find they enter an incorrect agreement # or the agreement # has been installed don other server.
Case 1: if you don’t see any apps after login Office 365, make sure you have Office 365 license.
Case 2: Today, I checked the Microsoft Office 365 and there is no apps. It is not just me. I refresh, and it is the same. Another user has the same issue, I cleaned the cookies, and browsing history and it is the same.

A: According to your description, I found that there is one Service Incident MO544165 about “Some users may be unable to view or access Microsoft 365 apps or services” Office 365 admin center > Service health. Microsoft’s relevant team is investigating and working on this incident to fixing it.
I will monitor this incident. When the issue is fixed, I will update the thread information with latest information.
Below is the SI information:
Title: Some users may be unable to view or access Microsoft 365 apps or services
User impact: Some users may be unable to view or access Microsoft 365 apps or services
More info: Impacted services may include, but are not limited to: – Microsoft 365 Online apps – Users may be unable to access Microsoft 365 web apps, such as Excel Online. Additionally, the search bar may not appear in any Office Online service. – Microsoft Teams – Admins may be unable to access the Microsoft Teams admin center. – SharePoint Online – Users may be unable to view the settings gear, search bar and waffle. – Microsoft Planner – Users may be unable to access Microsoft 365 web apps through Microsoft Planner. – Yammer – The search bar is missing from the User Interface. – Outlook on the web – Users may experience slowness or latency when accessing or using the service. Microsoft Project for the Web – Users may be unable to view the waffle menu, settings, and help content. Whilst the Microsoft 365 apps may not render, users can still access the applications directly through the URL. Some examples of these include: Microsoft 365 Admin Center – admin.microsoft.com Outlook – outlook.office.com Microsoft Teams – teams.microsoft.com Word Online – microsoft365.com/launch/word Excel Online – microsoft365.com/launch/excel
Scope of impact: Impact is specific to some users who are served through the affected infrastructure.
The temporary solution could be accessing the apps directly, for example: https://outlook.oofice.com/mail for email, https://mycompnay.sharepoint.com for SharePoint.
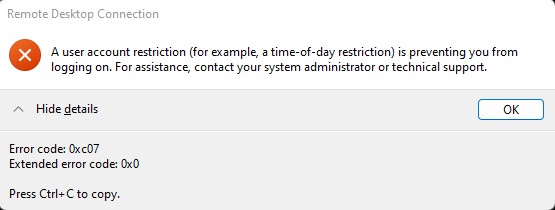
Situation: The user is member of domain admins. However, he can’t access his remote computer using RDP with this error: A user account restriction is preventing you from logging on

Troubleshooting: We find this user is also member for Windows Protection users group which blocks him to use RDP. Please refer to this post:
Situation: The client just configured a site to site VPN to access AWS. However, it doesn’t work.
Troubleshooting: Use Monitor, we can see it was denied by RILE Interzone-default. We fix the problem by creating a new rule called WAS Traffix.
Go to POLICY>Security.

Situation: The client tries to commit a new configuration on their PA Firewall, but it failed.

Troubleshooting: Login PA firewall and go to NETWORK>Virtual Routers>Statice Routes>default, Find both Route to AWS New and Route to AWS New 2 (2 tunnels) are setup 10. The second one should be different METRIC. Setup the second tunnel to 20, fix the problem.

If you receive an error message indicating that you do not have sufficient privileges to delete the “cn=Microsoft Exchange System Objects” container in Active Directory, it’s likely that your account does not have the necessary permissions to delete this container.

Here are some steps you can take to resolve this issue:
The error message “palo alto firewall failed in virtual-router default the static route route to is not unique” indicates that there is a problem with the configuration of the Palo Alto firewall.

Specifically, it appears that there is a static route configured in the “default” virtual router that is not unique. This means that there are two or more routes with the same destination network and prefix length. This can cause issues with traffic routing and can lead to network connectivity problems.
To resolve this issue, you will need to review the static routes configured in the “default” virtual router and ensure that each destination network has a unique route. You may need to remove or modify duplicate routes to ensure that traffic is routed correctly.
It is also important to review the overall network topology and routing configuration to ensure that there are no other issues that could be contributing to this problem. This may involve reviewing the routing tables of other devices in the network, as well as any routing protocols that are being used.
If your computer is turning on and then immediately turning off, or if you can’t see the Windows screen after a Windows update, there are a few things you can try to fix the issue:
Situation: When attempting to reset your office 365 password, you may receive this message: You can’t reset your own password because password reset isn’t turned on for your account. You must contact your administrator to turn on password reset for your account.
Resolution: Have your administrator to enabling self-service in Office 365. Please refer to this post:
Situation: The client attempts to join a remote computer to their domain over GlobalProtect. They can join the computer to the domain. However, they can’t login using domain account after restarting the domain computer because the GlobalProtect VPN is off.
Troubleshooting and cases.
Case 1: If you lock the PC, instead of the switch user option, it does not disconnect GP and will allow you to log into the domain account.
Case 2: Cache the domain account by Run different user.
Run an application, for example PanGPA.exe > shift+right clicked > Run as different user.
3. Cache the by mapping a domain network drive.
4. Add Windows Credentials manually.
Run Credentials Manager>Windows Credentials>Add a Windows credentials.
