Roaming profile issue: Windows cannot find the local profile and is logging you on with a temporary profile. Changes you make to this profile will be lost when you log off.

The error message “Windows cannot find the local profile and is logging you on with a temporary profile. Changes you make to this profile will be lost when you log off” usually indicates a problem with a roaming user profile on a Windows system. Here are some steps you can follow to troubleshoot and fix this issue:

  1. Check the network connectivity: Make sure the computer is properly connected to the network and that there are no network issues that might prevent the user’s roaming profile from being loaded.
  2. Check the permissions on the user’s profile folder: Verify that the user has full permissions to their roaming profile folder on the server. If the user does not have the correct permissions, Windows may not be able to load the profile.
  3. Delete the user’s temporary profile: Sometimes, Windows may create a temporary profile for the user, which can cause the issue. To fix this, log in as a different user with administrator privileges, navigate to C:\Users, and delete the temporary profile folder for the affected user. Then, log in as the affected user again and see if the issue is resolved.
  4. Check the user’s registry entries: Check the registry entries for the user’s roaming profile to make sure they are correct. To do this, log in as a different user with administrator privileges, open the Registry Editor, and navigate to HKEY_LOCAL_MACHINE\SOFTWARE\Microsoft\Windows NT\CurrentVersion\ProfileList. Find the registry entry for the affected user’s profile and check that the value for the “ProfileImagePath” key is correct.
  5. Re-create the user’s profile: If none of the above steps work, you may need to re-create the user’s roaming profile. To do this, log in as a different user with administrator privileges, delete the user’s profile folder on the server, and then have the user log in again to create a new profile.

By following these steps, you should be able to resolve the issue of Windows not being able to find the user’s local profile and logging them on with a temporary profile.

Troubleshooting email 554 message not allow isssue

A “554 Message Not Allowed” error typically occurs when an email server rejects an incoming message. This error message indicates that the recipient’s mail server or email account has blocked the email, usually due to spam or other security concerns. Here are some steps you can take to troubleshoot this error:

  1. Verify that the email address you are sending to is correct and active. Ensure that there are no typos or other errors in the email address.
  2. Check the content of your email message. Make sure that your message is not spam or contains any suspicious content that may trigger the recipient’s spam filter.
  3. Check your IP address reputation. If your IP address has a poor reputation due to past spam or security issues, it may be blocked by the recipient’s mail server. You can use online reputation tools like SenderScore or MXToolbox to check your IP address reputation.
  4. Contact the recipient to check if their mail server is experiencing any issues. It’s possible that the recipient’s mail server is down or experiencing other issues that prevent it from accepting incoming messages.
  5. Try sending the message from a different email account or service. If the issue persists, you may need to contact your email provider or IT department for further assistance.

Receive tons of Crowdstrike alter messages

Situation: We received many New detection such as Action taken: Endpoint detection, process would have been blocked if related prevention policy setting was enabled. Sensor hostname: ANDREW02 Endpoint detection URL: https://falcon.us-2.crowdstrike.com/activity/detections/detail/6fa1575720ae43248d15e104d0e69a80/738776163848 Endpoint detection status: New File path: \Device\HarddiskVolume3\Program Files\Malwarebytes\Anti-Malware\ig-1.exe Last behavior timestamp: 2023-02-03T14:26:18Z Sensor platform: Windows OS version: Windows 11 Behavior objective: Falcon Detection Method Local IP address: 192.168.1.149 Severity: Informational User ID: S-1-5-21-876873567-1263676363-868425949-5726 User name: Andrew Behavior timestamp: 2023-02-03T14:26:18Z See in Falcon. Do we need to do anything to stop this alert?

Resolutioin 1: The detection is for an Informational detection which is the lowest confidence event as to being malicious. You are seeing these because your settings for Sensor Anti-malware in your prevention policy is set to the following:

Detect is set to Extra Aggressive which triggers the detection and the Alert Prevention is set to Aggressive which does not act on Informational detections

You can either lower your detect to Aggressive to not detect informational events or you can increase your Prevention to Extra Aggressive to act on the informational detections.

Resolution 2: We have identified the reason for the email alerts on Informational detections. These are being generated due to the Fusion Workflows you currently have configured. https://falcon.us-2.crowdstrike.com/workflow/fusion Please disable or modify these workflows to stop the emails being generated on your account.

Why an email is in Expanded status in Microsoft 365 message trace result

Situation: A recipient doesn’t receive an email. When the Exchange admi checks the status using Microsoft 365 message trace, it shows Expanded.

Troubleshooting:

Expanded status in the Microsoft 365 Message Trace result means the email was rejected by a recipient’s mail server due to a spam filter or Exchange rule or policy.

Note: When a message trace is performed, the results will typically show a summary of the delivery status, such as “Delivered,” “Failed,” or “Pending.” However, by expanding the result, administrators can view more detailed information about the delivery, including any error codes that were generated and the specific steps taken by the email delivery system to attempt delivery.


Can’t print because of Windows update

Situation: The client reports no one can send printer job to their label printer.

Troubleshooting: We find there is a Windows Update in the printer server.

  1. Installed Windows update on all workstations.
  2. Make sure the guest account on the server is enabled. Pease refer to this post:

3. If you have problem to enable Guest account, please you can add a guest account, for example visitor by following these steps:

  1. Open an elevated command prompt. Here’s how:
    1. Press the key with the windows logo on it and the R key at the same time.
      This will open the “Run” box.
    2. In the “Run” box that opened up, Type “cmd” (without the quote marks) into the box next to the word open.
    3. Hold down the Ctrl and Shift keys and Press Enter at the same time.
      This will run the command as an administrator, and you will see a black window open up with a flashing command prompt.
  2. Use the following commands in the elevated command prompt. You can type them yourself, or you can copy and paste them and press the Enter key afterward to execute the final command.  (If you wish to use a different name, type the commands one at a time and replace Visitor with your desired name. If it has a space in it, you have to enclose the name in quotes like this: “Guest User”).  Remember to press the “Enter” key at the end of each line to execute the commands.

net user “Visitor” /add

net localgroup Users “Visitor” /delete

net localgroup Guests “Visitor” /add

  • If you want to add a password to the guest account, then type the following command as well, replacing Visitor with your Guest Account Name, and remember to replace NewPassword with the actual password you wish to use.

net user “Visitor” “NewPassword”

  • When you are finished, you can close the command prompt window.

The Internet browser displays fake McAfee notifications

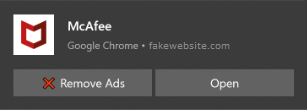
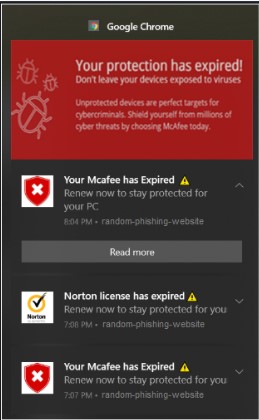
Situations: You might see some unwanted pop-up messages that appear to come from McAfee, but which don’t originate from McAfee. Here are some examples.

These messages are ‘spoofed’ (fake) messages that pretend to be from McAfee and try to make you click one of their options. If you click the options in a fake pop-up or alert, the security of your PC might be compromised. So, it’s always a best practice to read pop-ups or alert messages carefully.

To stop web push notifications on your computer, please follow these steps.

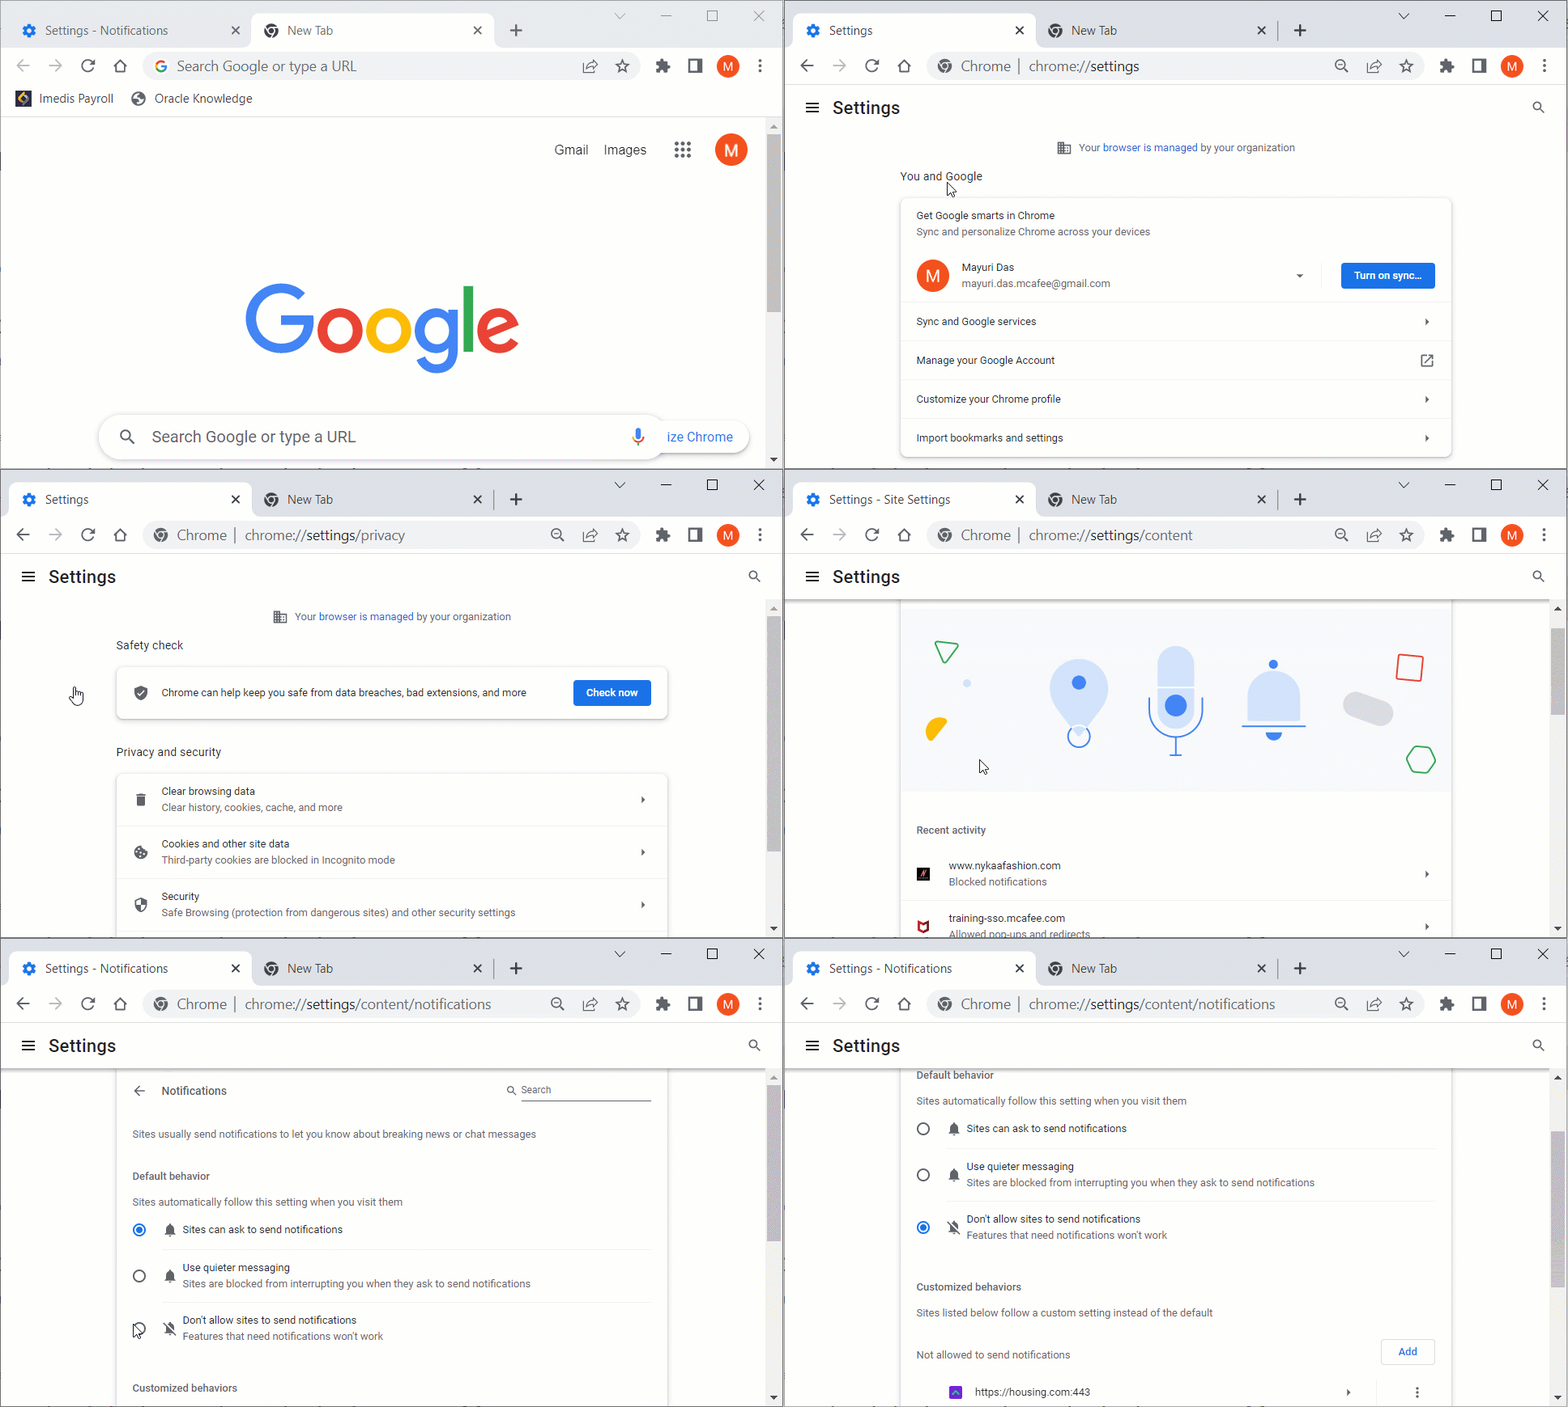
For Chrome,

  1. Open Chrome.
  2. At the top right, click the More actions icon (), then click Settings.
  3. Under Privacy and Security, click Site Settings, then Notifications.
  4. To block all notifications, select Don’t allow sites to send notifications.

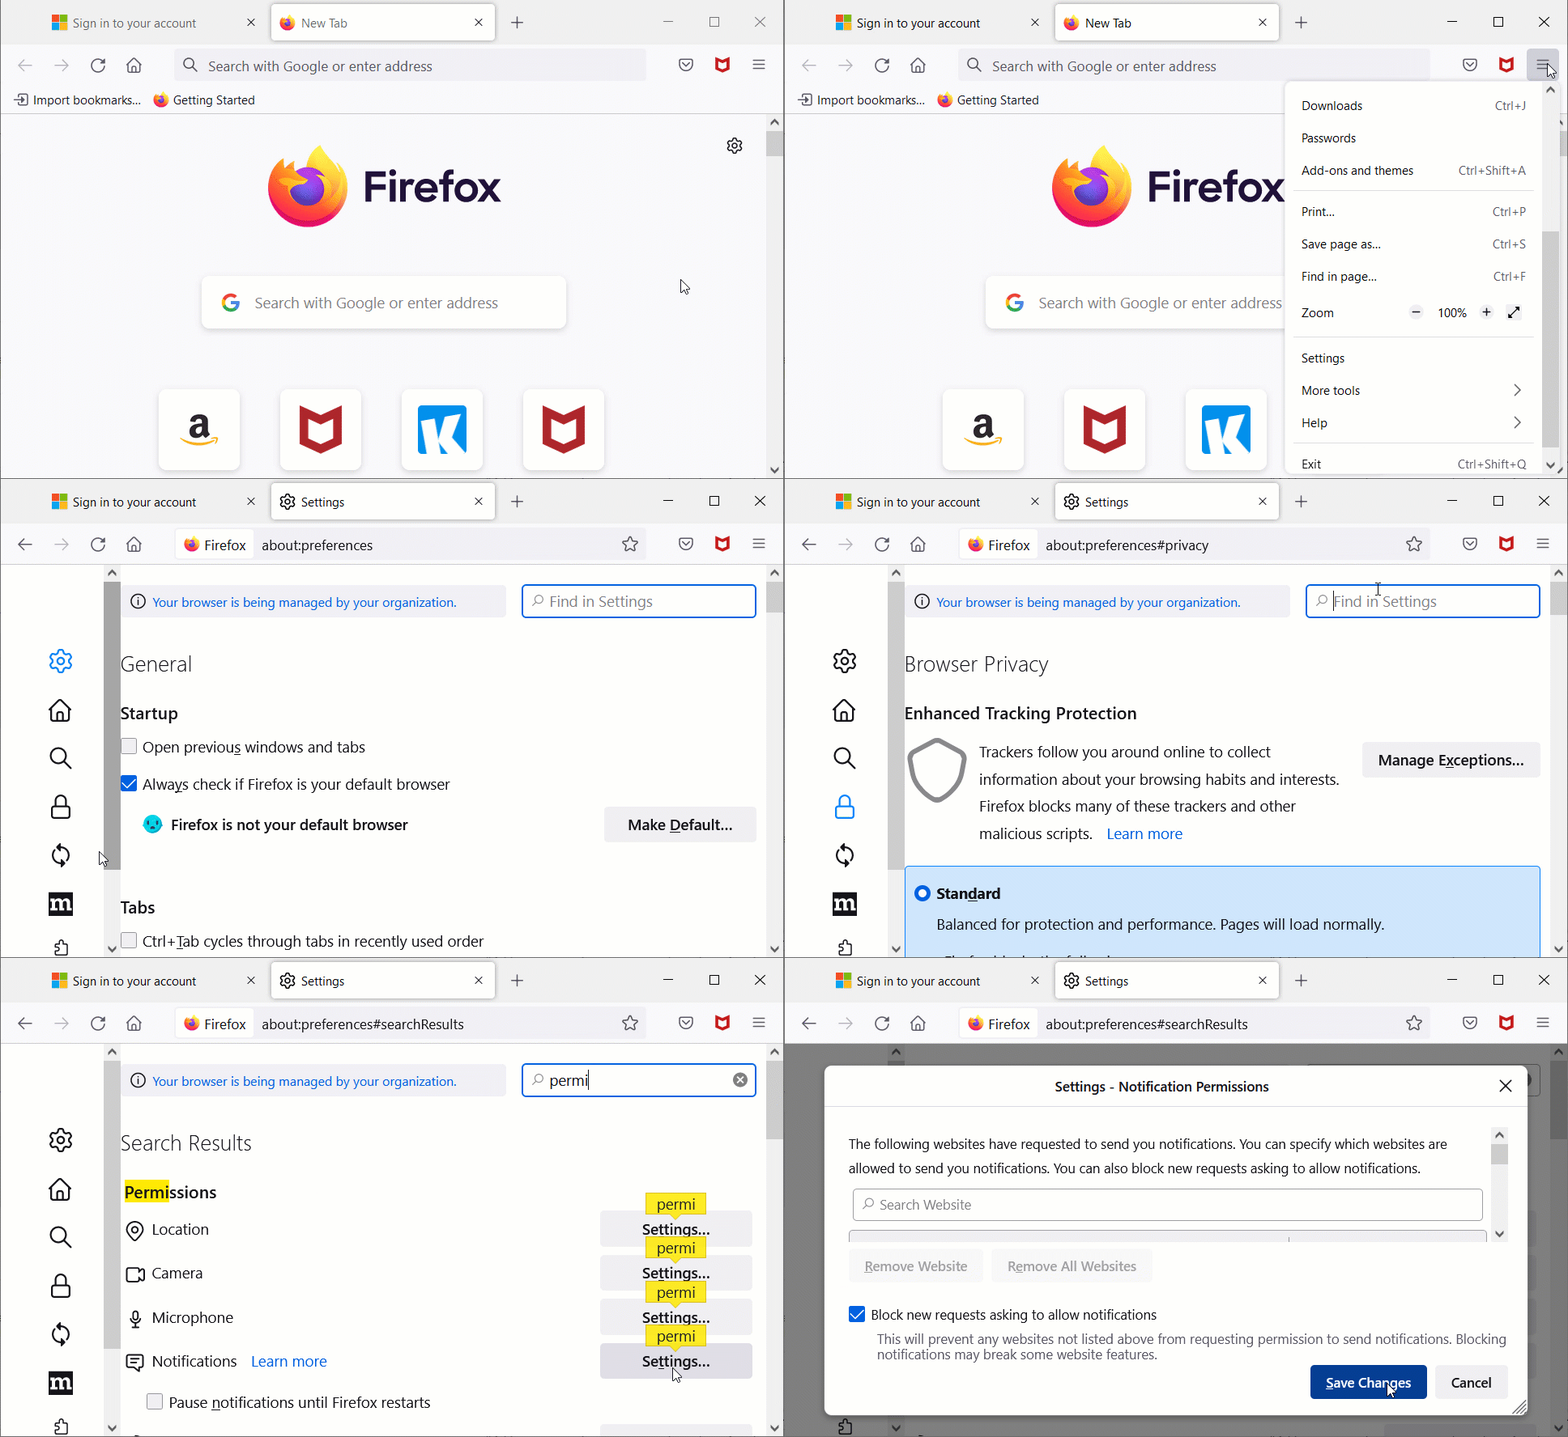
For Firefox,

  1. Open Firefox.
  2. Click the stacked menu icon () at the top right.
  3. Click SettingsPrivacy & Security.
  4. Scroll down to find Permissions or type Permissions in the search bar (Find in Settings)
  5. Click Settings next to Notifications.
  6. To stop websites from making any new requests to send notifications, click the Block new requests asking to allow notifications checkbox and then Save Changes.

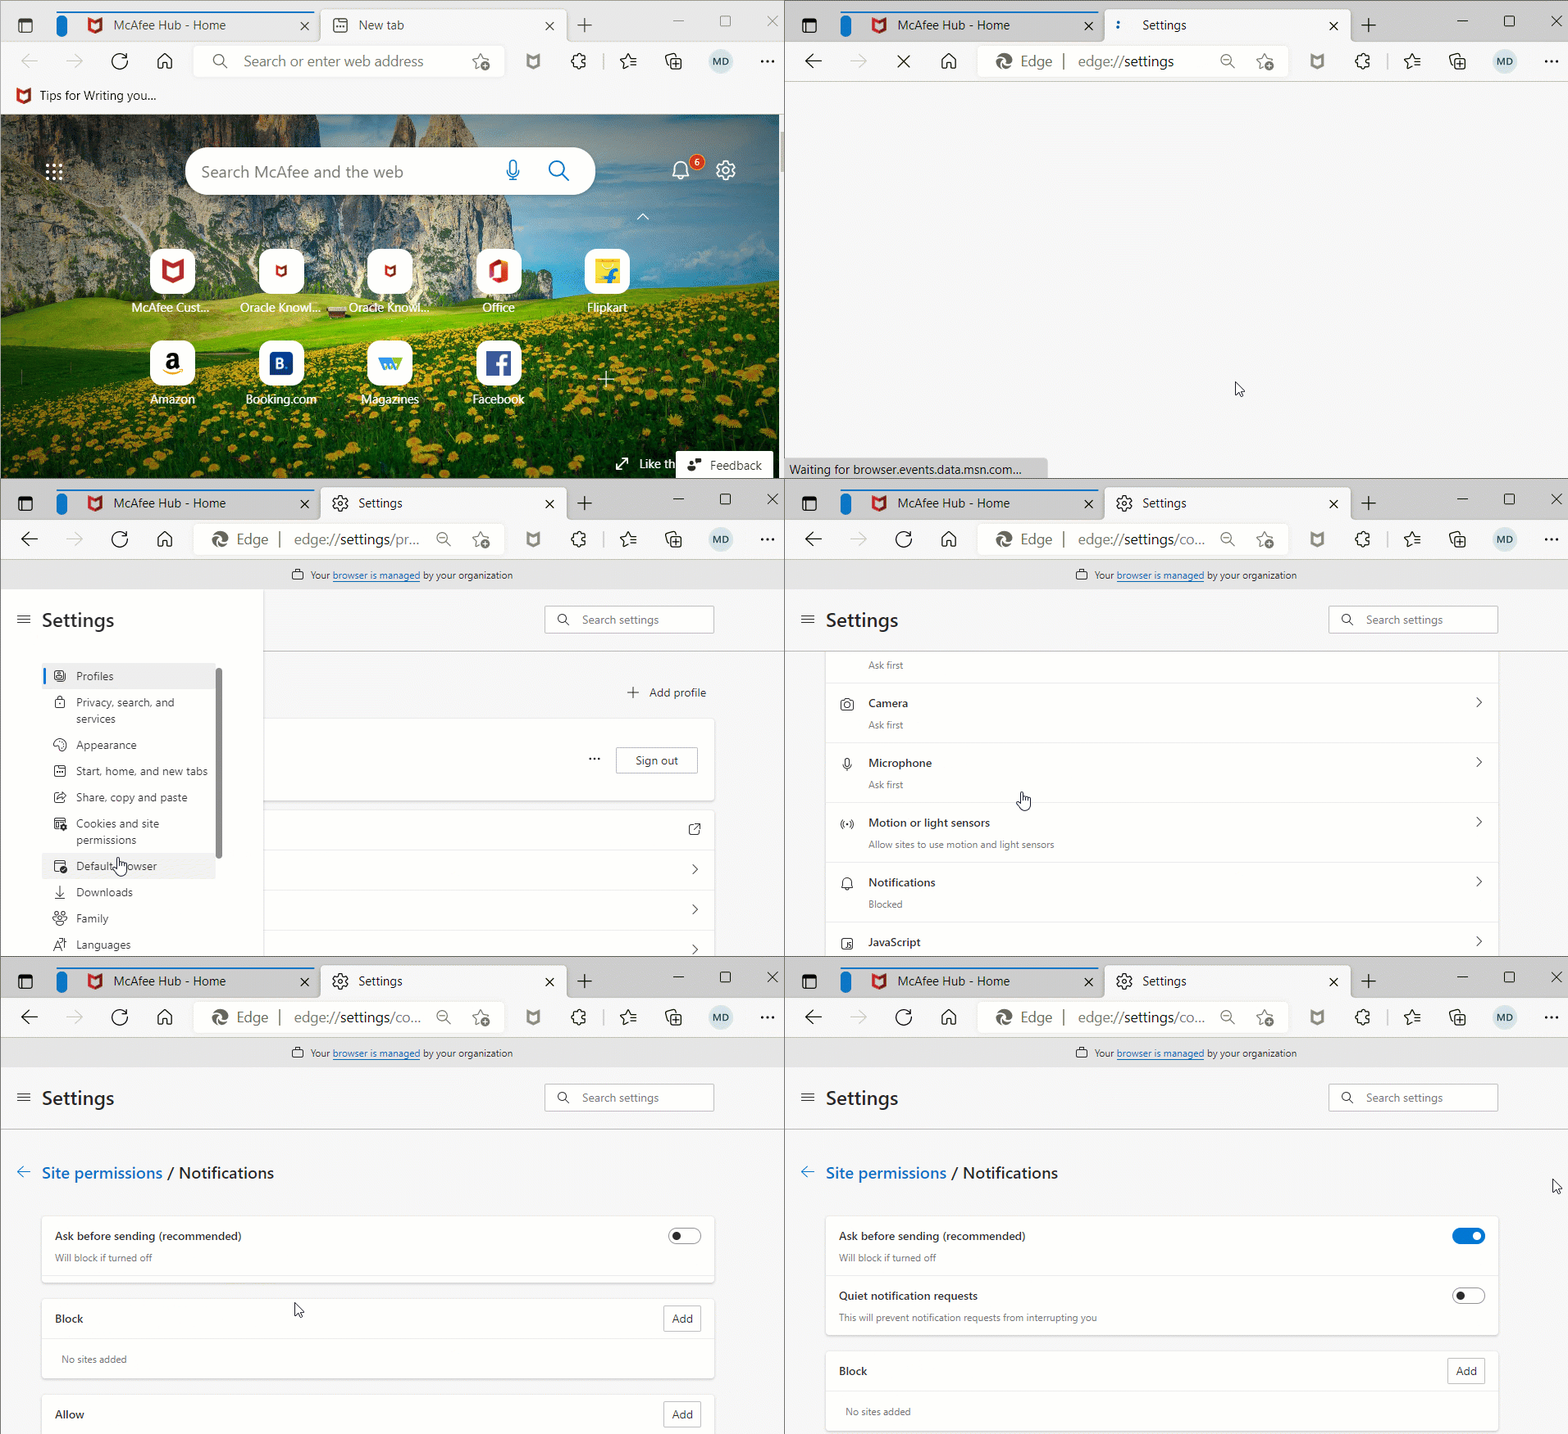
For Microsoft Edge,

  1. Open New Edge.
  2. Click the Settings and more icon () at the top right.
  3. Click Settings and then Cookies and site permissions.
  4. Scroll down to find All permissions and click Notifications.
  5. To block all notifications, turn off Ask before sending (recommended).


Fixing Google Chrome popup “Your MacAfee expired today”

The “Your McAfee expired today” pop-up message that appears in Google Chrome may be caused by a malware or an unwanted software installed on your computer. To turn off this pop-up message, you can follow these steps:

  1. Open Google Chrome and click on the three dots (menu) in the upper-right corner of the window.

2. Select “Settings” from the drop-down menu.

3. Click on Extensions under Settings

4. Remove the suspected Extensions.

5. restart the browser or computer

This will reset the settings in Google Chrome to their original defaults, including any browser extensions that may be causing the pop-up message. After resetting the settings, you should no longer see the “Your McAfee expired today” pop-up message.

If the pop-up message persists, it may be a good idea to run a malware scan on your computer using your antivirus software, such as McAfee, to remove any malicious software that may be causing the issue.

Fixing Messages keep popup in Windows 10

There are several reasons why you may be receiving pop-up messages on your Windows 10 computer:

  1. System notifications: These are notifications from the operating system, such as low battery warnings or notifications about updates.
  2. Anti-virus software alerts: Your anti-virus software may send pop-up messages to alert you about potential threats on your computer.

  1. Application notifications: Applications on your computer may also send pop-up messages to provide information or alert you to a new message, update, or other event.
  2. Adware or malware: Pop-up messages may also be a result of adware or malware on your computer. These malicious programs can cause pop-ups and other unwanted behavior.

If you want to stop the pop-up messages, you can try the following solutions:

  1. Disable system notifications: You can go to the “Settings” app and then to “System,” “Notifications & Actions,” and turn off the notifications you don’t want to see.
  2. Disable anti-virus alerts: You can go to the settings or preferences of your anti-virus software and turn off the pop-up alerts.
  3. Disable application notifications: You can go to the settings or preferences of the application that is sending the pop-up messages and turn off the notifications.
  4. Scan for malware: If you suspect that your pop-up messages are a result of malware, you can run a full scan of your computer using your anti-virus software to detect and remove any threats.

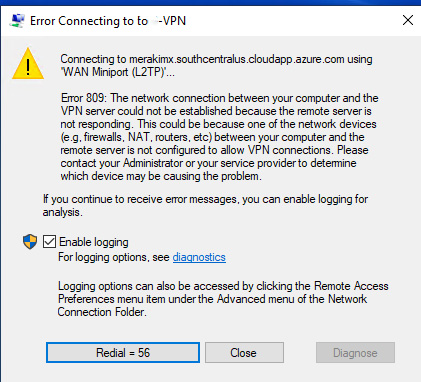
VPN error 809: The network connection between your computer and the VPN server could not be established because the remote server is not responding

Situation: The client has a Windows Server running as VPN server. Some users can’t establish the VPN with this Error Description: 809: The network connection between your computer and the VPN server could not be established because the remote server is not responding. This could be because one of the network devices (e.g, firewalls, NAT, routers, etc) between your computer and the remote server is not configured to allow VPN connections. Please contact your Administrator or your service provider to determine which device may be causing the problem.

Troubleshooting: As the popup error message mentions that “The network connection between your computer and the VPN server could not be established because the remote server is not responding”.

  1. On the client site, check the VPN traffics and make sure there is not blocked UDP port 500, UDP port 4500 on the firewall. For example, port 500, UDP port 4500 are allowed.

2. On the server site, also make sure the VPN traffics are coming or not denied.


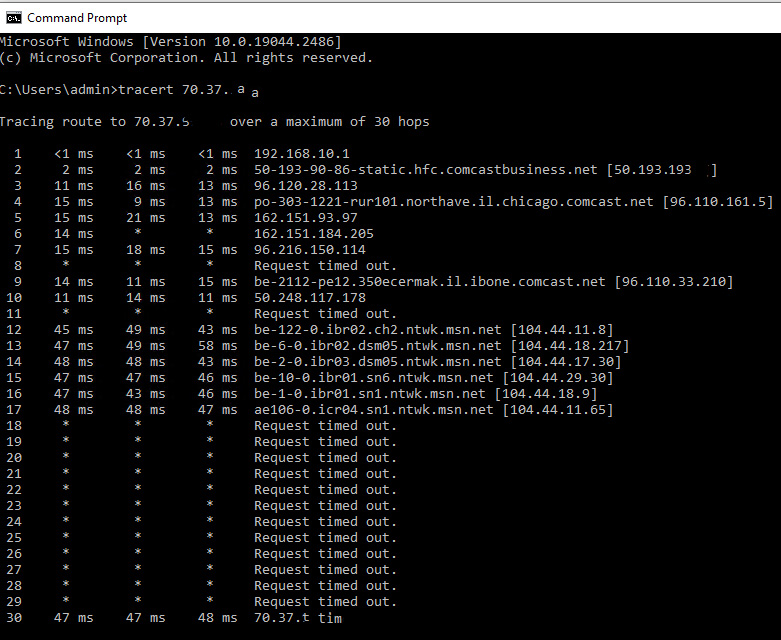
3. Also on the client site, trace route to check any timeout at end point.

4. Check the logs on server and client

Resolutions:

  1. Check your network settings: Ensure that the network settings on your device are properly configured and that you have a stable internet connection.
  2. Restart your device and the VPN server: Try restarting your device and the VPN server to see if this resolves the issue.
  3. Disable third-party security software: Some third-party security software, such as antivirus or firewall programs, can interfere with VPN connections. Temporarily disabling these programs may help resolve the error.
  4. Verify the VPN server address: Make sure that you are using the correct VPN server address and that it is reachable from your device.
  5. Update your VPN client: Check to see if there is an updated version of your VPN client available, and if so, install it.
  6. Contact your VPN provider: If none of the above steps help, contact your VPN provider for further assistance. They will be able to provide you with more specific information about the cause of the error and how to resolve it.